需要申请域名购买空间做网站测试吗营销方案案例
文章目录
- 1. 关键问题描述
- 2. 通过OpenCV读取视频/打开摄像头抓取视频
- 3. 通过PyQt 中的 QTimer定时器实现视频播放
- 4. PyQt 视频播放器实现代码
- 参考文献
1. 关键问题描述
在前面的文章中已经分享了pyqt制作图像处理工具的文章,也知道pyqt通过使用label控件显示图像的方式。在此,对于视频的显示,其本质上一帧一帧的图像,因此也可以使用同样的方式对其显示。但是,有两个关键的问题需要解决,也即:
a. 如何读取视频/或通过摄像头抓取视频
b. 如果连续显示视频图像且不会造成界面假死
2. 通过OpenCV读取视频/打开摄像头抓取视频
主要函数:
cv.VideoCapture.isOpened(),检查视频捕获是否初始化成功
cv.VideoCapture.read(),捕获视频文件、视频流或捕获的视频设备
cv.VideoCapture.release(),关闭视频文件或设备,释放对象
cv.VideoWriter.release(),关闭视频写入,释放对象
抓取视频
import cv2
import timecap = cv2.VideoCapture(0, cv2.CAP_DSHOW) # 使用cv2.CAP_DSHOW后启动快,但帧率慢了
cap.set(6, cv2.VideoWriter.fourcc('M', 'J', 'P', 'G'))
# cap.set(6, cv2.VideoWriter.fourcc('Y', 'U', 'V', '2'))# 使用cv2.CAP_DSHOW后大小为640
cap.set(3, 2560)  # 640 1280 1920  2560# 宽
# cap.set(4, 720)   # 720  1080  # 高
# cap.set(5, 60)  # 帧数
# cap.set(10, 150)  # 亮度
# cap.set(14, 150)  # 增益
# cap.set(11, 90)  # 对比度
# cap.set(15, 150)  # 曝光print(cap.get(cv2.CAP_PROP_FRAME_WIDTH))
print(cap.get(cv2.CAP_PROP_FRAME_HEIGHT))
print(cap.get(cv2.CAP_PROP_FPS))num = 0
start = time.time()
fps = '0'
while(True):ret, frame = cap.read()num = num + 1frame = cv2.flip(frame, 1)# frame = beauty_face(frame)if (time.time() - start) > 1:fps = num / (time.time() - start)fps = str(round(fps, 2))num = 0start = time.time()cv2.putText(frame, "FPS:" + fps, (20, 20), 1, 1.5, (255, 255, 255), 2)cv2.imshow("DST", frame)stop = time.time()elapsed = stop - start# print('time=', elapsed)if 1 < elapsed < 1.5:print('time=', elapsed)print('frame num:', num)if cv2.waitKey(1) & 0xFF == ord('q'):break
cap.release()
cv2.destroyAllWindows()
读取视频
import cv2 as cvif __name__ == '__main__':# 创建视频读取/捕获对象vedioRead = "../images/test.mp4" # 读取视频文件的路径capRead = cv.VideoCapture(vedioRead) # 实例化 VideoCapture 类# 读取视频文件frameNum = 0 # 视频帧数初值while capRead.isOpened(): # 检查视频捕获是否成功ret, frame = capRead.read() # 读取下一帧视频图像if ret is True:cv.imshow(vedioRead, frame) # 播放视频图像if cv.waitKey(1) & 0xFF == ord('q'): # 按 'q' 退出breakelse:print("Can't receive frame at frameNum {}".format(frameNum))breakcapRead.release() # 关闭读取视频文件capWrite.release() # 关闭视频写入对象cv.destroyAllWindows() # 关闭显示窗口
3. 通过PyQt 中的 QTimer定时器实现视频播放
使用 OpenCV 对视频文件进行解码获得图像帧以后,可以使用 QTime 定时器来控制 QLabel 控件中的图像更新,实现视频播放。
PyQt5 中的 QTimer类提供了重复的和单次的定时器,为计时器提供了高级编程接口。
要使用定时器,需要先创建一个QTimer实例,将定时器的timeout信号连接到相应的槽函数,并调用start(),定时器就会以设定的间隔发出timeout信号。
QTimer类中的常用方法:
start(milliseconds):启动或重新启动定时器,时间间隔为毫秒。如果定时器已经运行,它将被停止并重新启动。如果singleShot信号为真,定时器将仅被激活一次。
stop():停止定时器
QTimer类中的常用信号:
singleShot:在给定的时间间隔后调用一个槽函数时发射此信号。
timeout:当定时器超时时发射此信号。
注意:可以设置槽函数的执行次数,默认为定时器开启后周期性调用槽函数。如果设置了setSingleShot(True),则槽函数仅执行一次。
关键代码:
# 初始化定时器,并绑定触发信号
self.timerCam = QtCore.QTimer()  # 定时器,毫秒
self.timerCam.timeout.connect(self.refreshFrame)  # 计时器结束时调用槽函数刷新当前帧# 开始定时
if self.cap.isOpened():      # 检查视频捕获是否成功self.timerCam.start(20)  # 设置计时间隔并启动,定时结束将触发刷新当前帧
# 暂停播放
self.timerCam.blockSignals(True)  # 信号阻塞,暂停定时器
# 继续播放
self.timerCam.blockSignals(False)  # 取消信号阻塞,恢复定时器
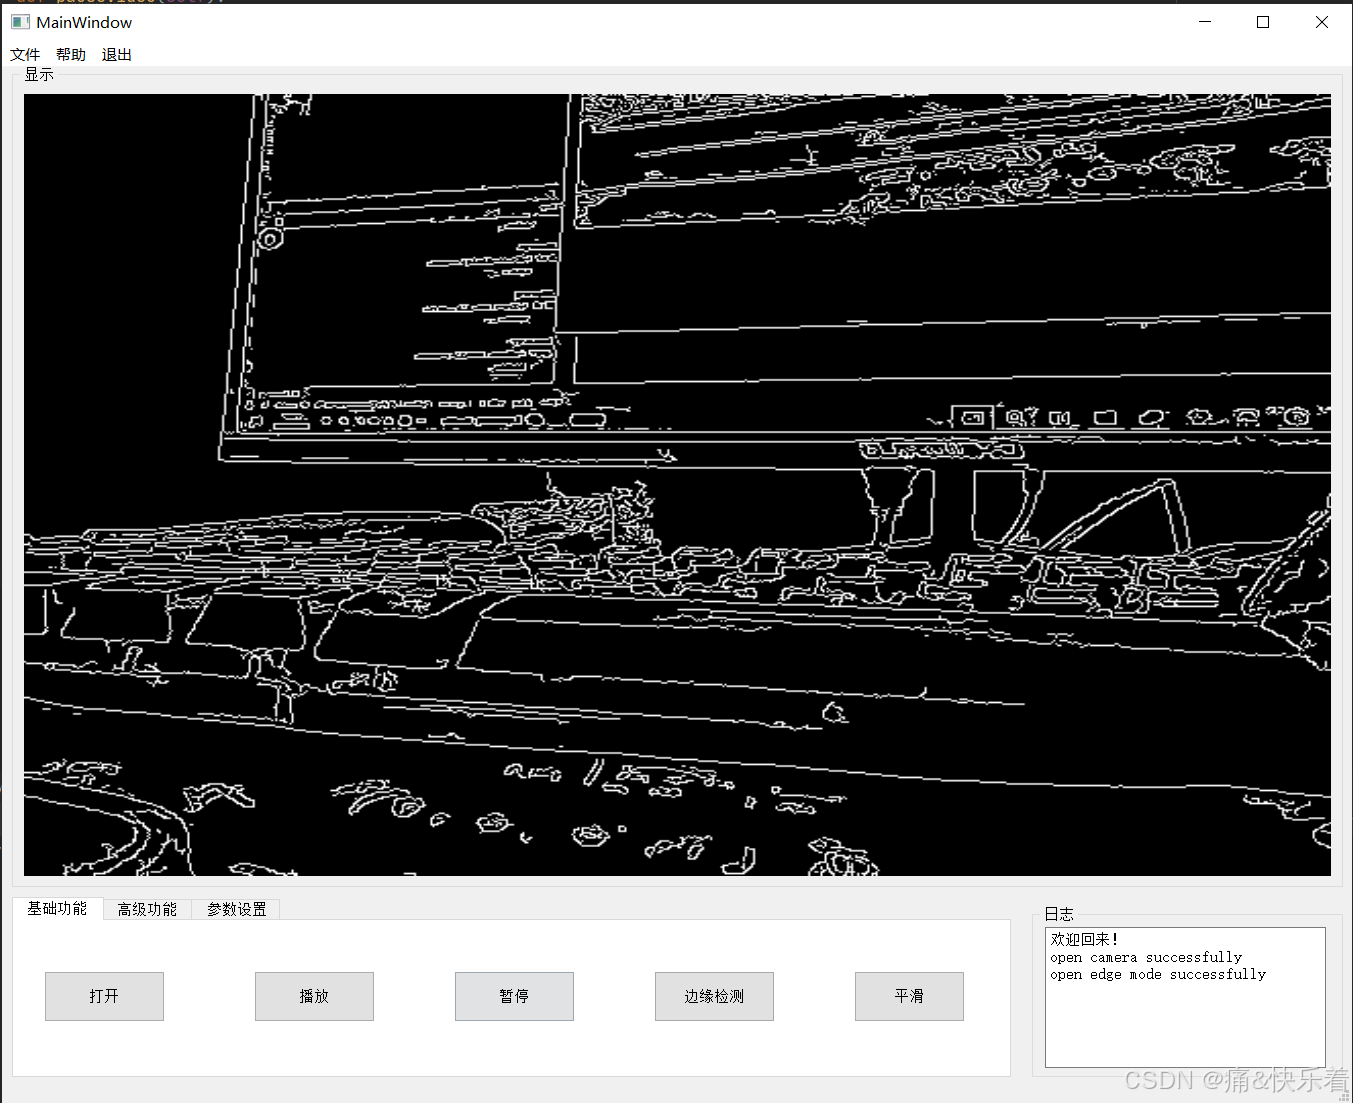
4. PyQt 视频播放器实现代码
import os
import sys
import cv2 as cv
import numpy as np
from PyQt5 import QtCore
from PyQt5.QtCore import QObject, pyqtSignal, QPoint, QRect, qDebug, Qt
from PyQt5.QtWidgets import *
from PyQt5.QtGui import *
from ui_VideoProV1 import Ui_MainWindow  # 导入 uiDemo8.py 中的 Ui_MainWindow 界面类class MyMainWindow(QMainWindow, Ui_MainWindow):  # 继承 QMainWindow 类和 Ui_MainWindow 界面类def __init__(self, parent=None):super(MyMainWindow, self).__init__(parent)  # 初始化父类self.setupUi(self)  # 继承 Ui_MainWindow 界面类self.timerCam = QtCore.QTimer()  # 定时器,毫秒self.cap = Noneself.frameNum = 1  # 视频帧数初值self.edge_flag = Falseself.smooth_flag = False# 添加可点击执行的菜单self.menu_file = QMenu("文件", self)temp = self.menuBar()temp.addMenu(self.menu_file)t = self.menu_fileself.action_open = QAction("打开", self)self.action_open.triggered.connect(self.openVideo)t.addAction(self.action_open)self.action_save = QAction("保存", self)t.addAction(self.action_save)t.addAction('其他')self.mTest = QAction("帮助", self)self.mTest.triggered.connect(self.trigger_actHelp)temp = self.menuBar()temp.addAction(self.mTest)self.action_close = QAction("退出", self)self.action_close.triggered.connect(self.close)temp = self.menuBar()temp.addAction(self.action_close)## # 菜单栏self.action_save.triggered.connect(self.saveSlot)  # 连接并执行 openSlot 子程序# 通过 connect 建立信号/槽连接,点击按钮事件发射 triggered 信号,执行相应的子程序 click_pushButtonself.pushButton.clicked.connect(self.openVideo)self.pushButton_2.clicked.connect(self.playVideo)self.pushButton_3.clicked.connect(self.pauseVideo)self.pushButton_4.clicked.connect(self.click_pushButton_5)  # # 按钮触发:边缘检测self.pushButton_5.clicked.connect(self.click_pushButton_6)  # 点击 # 按钮触发:双边self.timerCam.timeout.connect(self.refreshFrame)  # 计时器结束时调用槽函数刷新当前帧# 初始化self.frame = np.ndarray(())self.videoPath = 'test'self.textEdit_log.append("欢迎回来!")returndef openVideo(self):  # 读取视频文件,点击 pushButton_1 触发try:self.videoPath, _ = QFileDialog.getOpenFileName(self, "Open Video", "../images/", "*.mp4 *.avi *.flv")print("Open Video: ", self.videoPath)except:print("Open video failed.")returndef playVideo(self):  # 播放视频文件,点击 pushButton_2 触发if self.timerCam.isActive() == False:if self.videoPath.endswith(('avi', 'mp4')):self.cap = cv.VideoCapture(self.videoPath)self.textEdit_log.append('open video successfully')else:self.cap = cv.VideoCapture(0)self.textEdit_log.append('open camera successfully')if self.cap.isOpened():      # 检查视频捕获是否成功self.timerCam.start(20)  # 设置计时间隔并启动,定时结束将触发刷新当前帧else:  #self.timerCam.stop()  # 停止定时器self.cap.release()    # 关闭读取视频文件self.label_1.clear()  # 清除显示内容returndef pauseVideo(self):self.timerCam.blockSignals(False)  # 取消信号阻塞,恢复定时器if self.timerCam.isActive() and self.frameNum % 2 == 1:self.timerCam.blockSignals(True)  # 信号阻塞,暂停定时器self.pushButton_3.setText("继续")  # 点击"继续",恢复播放print("信号阻塞,暂停播放。", self.frameNum)self.textEdit_log.append("信号阻塞,暂停播放。" + str(self.frameNum))else:self.pushButton_3.setText("暂停")  # 点击"暂停",暂停播放print("取消阻塞,恢复播放。", self.frameNum)self.textEdit_log.append("取消阻塞,恢复播放。" + str(self.frameNum))self.frameNum = self.frameNum + 1def refreshFrame(self):  # 刷新视频图像ret, self.frame = self.cap.read()  # 读取下一帧视频图像self.frame = cv.flip(self.frame, 1)if self.smooth_flag:self.frame = cv.bilateralFilter(self.frame, 15, 30, 40, None)if self.edge_flag:# self.frame = cv.Canny(self.frame, 10, 60)self.frame = self.apply_heat_effect(self.frame)qImg = self.cvToQImage(self.frame)  # OpenCV 转为 PyQt 图像格式self.label_1.setScaledContents(True)self.label_1.setPixmap((QPixmap.fromImage(qImg)))  # 加载 PyQt 图像# self.frameNum = self.frameNum + 1# print("视频帧数:", self.frameNum)returndef cvToQImage(self, image):if image.dtype == np.uint8:channels = 1 if len(image.shape) == 2 else image.shape[2]if channels == 3:qImg = QImage(image, image.shape[1], image.shape[0], image.strides[0], QImage.Format_RGB888)return qImg.rgbSwapped()elif channels == 1:qImg = QImage(image, image.shape[1], image.shape[0], image.strides[0], QImage.Format_Indexed8)return qImgelse:QtCore.qDebug("ERROR: numpy.ndarray could not be converted to QImage. Channels = %d" % image.shape[2])return QImage()def click_pushButton_5(self):if self.edge_flag:self.edge_flag = Falseself.textEdit_log.append('close edge mode successfully')else:self.edge_flag = Trueself.textEdit_log.append('open edge mode successfully')returndef click_pushButton_6(self):if self.smooth_flag:self.smooth_flag = Falseself.textEdit_log.append('close smooth mode successfully')else:self.smooth_flag = Trueself.textEdit_log.append('open smooth mode successfully')returndef saveSlot(self):  # 保存图像文件# 选择存储文件 dialogtry:fileName, tmp = QFileDialog.getSaveFileName(self, "Save Image", "../images/", '*.png; *.jpg; *.tif')if self.frame.size == 1:return# OpenCV 写入图像文件ret = cv.imwrite(fileName, self.frame)if ret:print(fileName, self.frame.shape)except:print('save failed.')returndef cvToQImage(self, image):# 8-bits unsigned, NO. OF CHANNELS=1if image.dtype == np.uint8:channels = 1 if len(image.shape) == 2 else image.shape[2]if channels == 3:  # CV_8UC3# Create QImage with same dimensions as input MatqImg = QImage(image, image.shape[1], image.shape[0], image.strides[0], QImage.Format_RGB888)return qImg.rgbSwapped()elif channels == 1:# Create QImage with same dimensions as input MatqImg = QImage(image, image.shape[1], image.shape[0], image.strides[0], QImage.Format_Indexed8)return qImgelse:qDebug("ERROR: numpy.ndarray could not be converted to QImage. Channels = %d" % image.shape[2])return QImage()def qPixmapToCV(self, qPixmap):  # PyQt图像 转换为 OpenCV图像qImg = qPixmap.toImage()  # QPixmap 转换为 QImageshape = (qImg.height(), qImg.bytesPerLine() * 8 // qImg.depth())shape += (4,)ptr = qImg.bits()ptr.setsize(qImg.byteCount())image = np.array(ptr, dtype=np.uint8).reshape(shape)  # 定义 OpenCV 图像image = image[..., :3]return imagedef trigger_actHelp(self):  # 动作 actHelp 触发QMessageBox.about(self, "About", """打开视频或摄像头 v1.0""")returndef closeEvent(self):self.timerCam.stop()  # 停止定时器self.cap.release()  # 关闭读取视频文件self.label_1.clear()  # 清除显示内容if __name__ == '__main__':app = QApplication(sys.argv)myWin = MyMainWindow()myWin.show()sys.exit(app.exec_())
参考文献
[1] OpenCV-PyQT项目实战(9)项目案例04:视频播放