微信网站建设平台软文代发价格

🐌个人主页: 🐌 叶落闲庭
💨我的专栏:💨
c语言
数据结构
javaweb
石可破也,而不可夺坚;丹可磨也,而不可夺赤。
操作系统结构
- 一、操作系统体系结构
- 1.1操作系统的内核
- 1.1.1大内核(又名:宏内核/单内核)
- 1.1.2微内核
- 1.3分层结构
- 1.4模块化
- 1.5外核(exokernel)
- 二、操作系统引导
- 2.1什么是操作系统引导?
- 2.2操作系统引导过程
- 三、虚拟机
一、操作系统体系结构
1.1操作系统的内核
- 内核是操作系统最基本、最核心的部分
- 实现操作系统内核功能的那些程序就是内核程序
- 与硬件关系较紧密的模块:
-
- 时钟管理:实现计时功能
-
- 中断处理:负责实现中断机制
-
- 原语:
-
- 是一种特殊的程序
-
- 处于操作系统最底层,是最接近硬件的部分
-
- 这种程序的运行具有原子性 – – 其运行只能一气呵成,不可中断
-
- 运行时间较短、调用频繁
- 对资源系统进行管理的功能:
-
- 进程管理
-
- 存储器管理
-
- 设备管理
- 注意:这些管理工作更多的是对数据结构的操作,不会直接涉及硬件

- 注意:
-
- 操作系统内核需要运行在内核态
-
- 操作系统非内核功能运行在用户态
1.1.1大内核(又名:宏内核/单内核)
- 将操作系统的主要功能模块都作为系统内核,运行在核心态
- 优点:高性能
- 缺点:
-
- 1.内核代码庞大,结构混乱,难以维护
-
- 2.大内核中某个功能模块出错,就可能导致整个系统崩溃
- 典型的大内核/宏内核/单内核 操作系统:Linux、UNIX
- 特征、思想:
-
- 所有系统功能都放在内核里(大内核结构的OS通常也采用了“模块化”的设计思想)

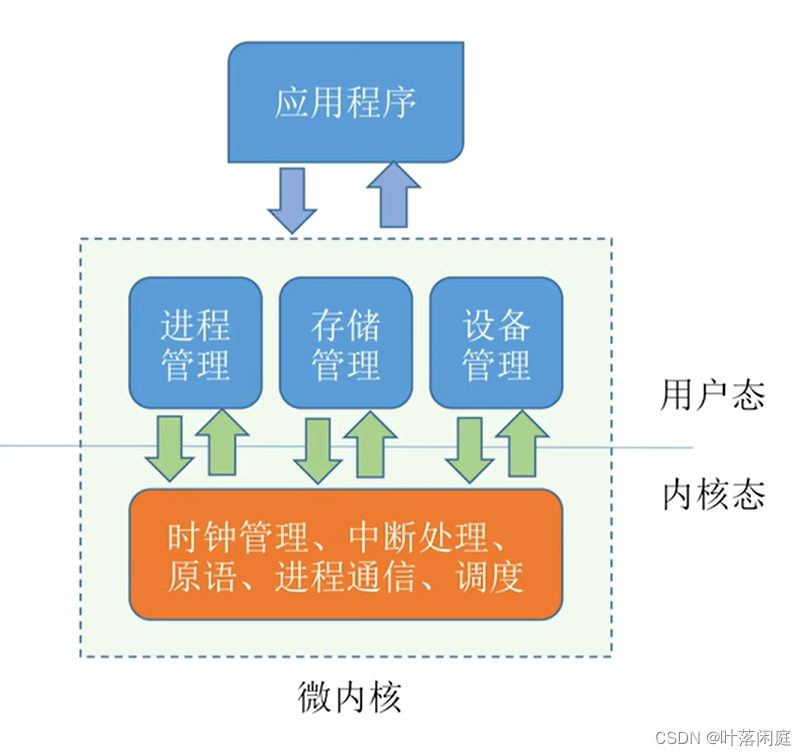
1.1.2微内核
- 只把最基本的功能保留在内核
- 优点:
-
- 1.内核功能少,结构清晰,方便维护,内核可靠性高
-
- 2.内核外的某个功能模块出错不会导致整个系统崩溃
- 缺点:
-
- 1.需要频繁地在核心态和用户态之间切换,性能低
-
- 2.用户态下的各功能模块不可以直接相互调用,只能通过内核的“消息传递”来间接通信
- 典型的微内核操作系统:Windows NT
1.3分层结构
- 特征、思想:内核分多层,每层可单向调用更低一层提供的接口
- 优点:
-
- 1.便于调试和验证、自底向上逐层调试验证
-
- 2.易扩充和易维护,各层之间调用接口清晰固定
- 缺点:
-
- 1.仅可调用相邻低层,难以合理定义各层的边界
-
- 2.效率低,不可跨层调用,系统调用执行时间长

1.4模块化
模块化是将操作系统按功能划分为若干个具有一定独立性的模块,每个模块具有某方面的管理功能,并规定好各模块间的接口,使各模块之间能通过接口进行通信,还可以进一步将各模块细分为若干个具有一定功能的子模块,同样也规定好各子模块之间的接口,把这种设计方法称为模块–接口法。
- 特征、思想:将内核分为多个模块,各模块之间相互协作
- 内核=主模块+可加载内核模块
- 主模块:只负责核心功能,如进程调度、内存管理
- 可加载内核模块:可以动态加载新模块到内核,而无需重新编译整个内核
- 优点:
-
- 1.模块间逻辑清晰易于维护,确定模块间接口后即可多模块同时开发
-
- 2.支持动态加载新的内核模块(如:安装设备驱动程序、安装新的文件系统模块到内核),增强OS适应性
-
- 3.任何模块都可以直接调用其他模块,无需采用详细传递进行通信,效率高
- 缺点:
-
- 1.模块间的接口定义未必合理
-
- 2.模块间相互依赖,更难调试和验证
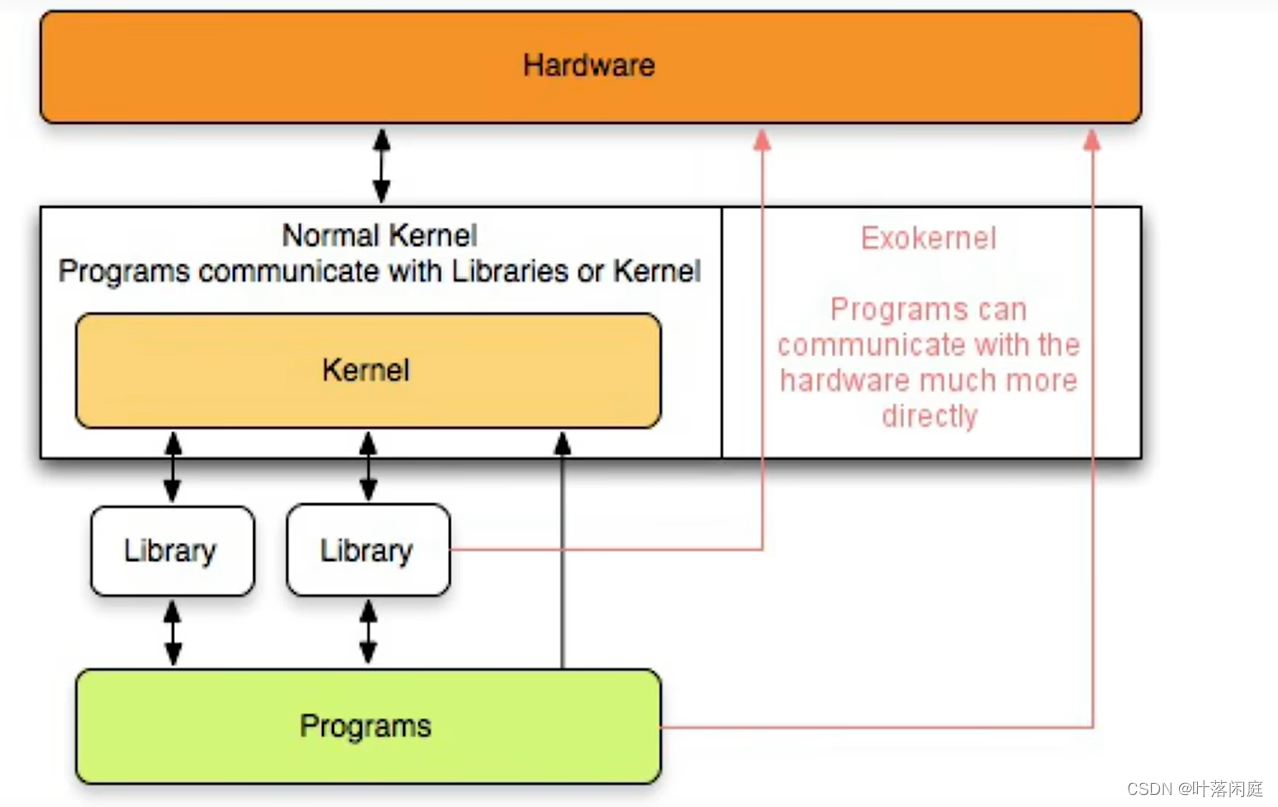
1.5外核(exokernel)
- 特征、思想:内核负责进程调度、进程通信等功能,外核负责为用户进程分配未经抽象的硬件资源,且由外核负责保证资源使用安全
- 优点:
-
- 1.外核可直接给用户进程分配“不虚拟、不抽象”的硬件资源,使用户进程可以更灵活的使用硬件资源
-
- 2.减少了虚拟硬件资源的“映射层”,提升效率
- 缺点:
-
- 1.降低了系统的一致性
-
- 2.是系统变得更复杂
**
二、操作系统引导
2.1什么是操作系统引导?
操作系统引导:开机的时候,怎么让操作系统运行起来
安装操作系统后:
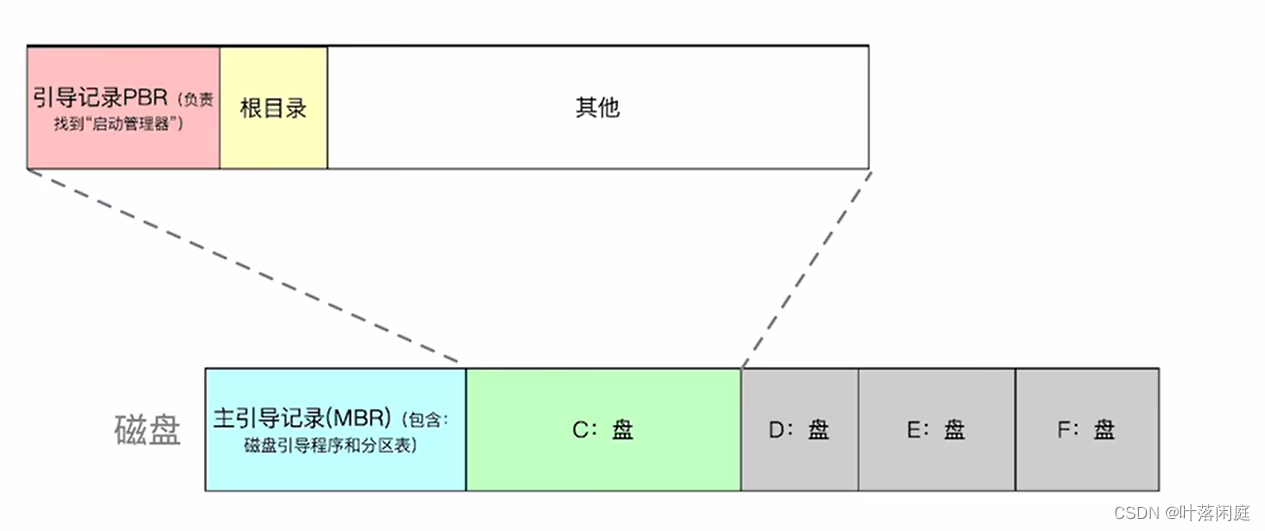
- 磁盘包括:
-
- 主引导记录(MBR)(包含:磁盘引导程序和分区表)
-
- C:盘
-
- D:盘
-
- E:盘等
-
- C:盘中又包含:
-
- 引导记录PBR(负责找到“启动管理器”)
-
- 根目录
-
- 其他
- 主存:
-
- 由ROM(BIOS)包含:ROM引导程序,即自举程序和RAM组成
2.2操作系统引导过程
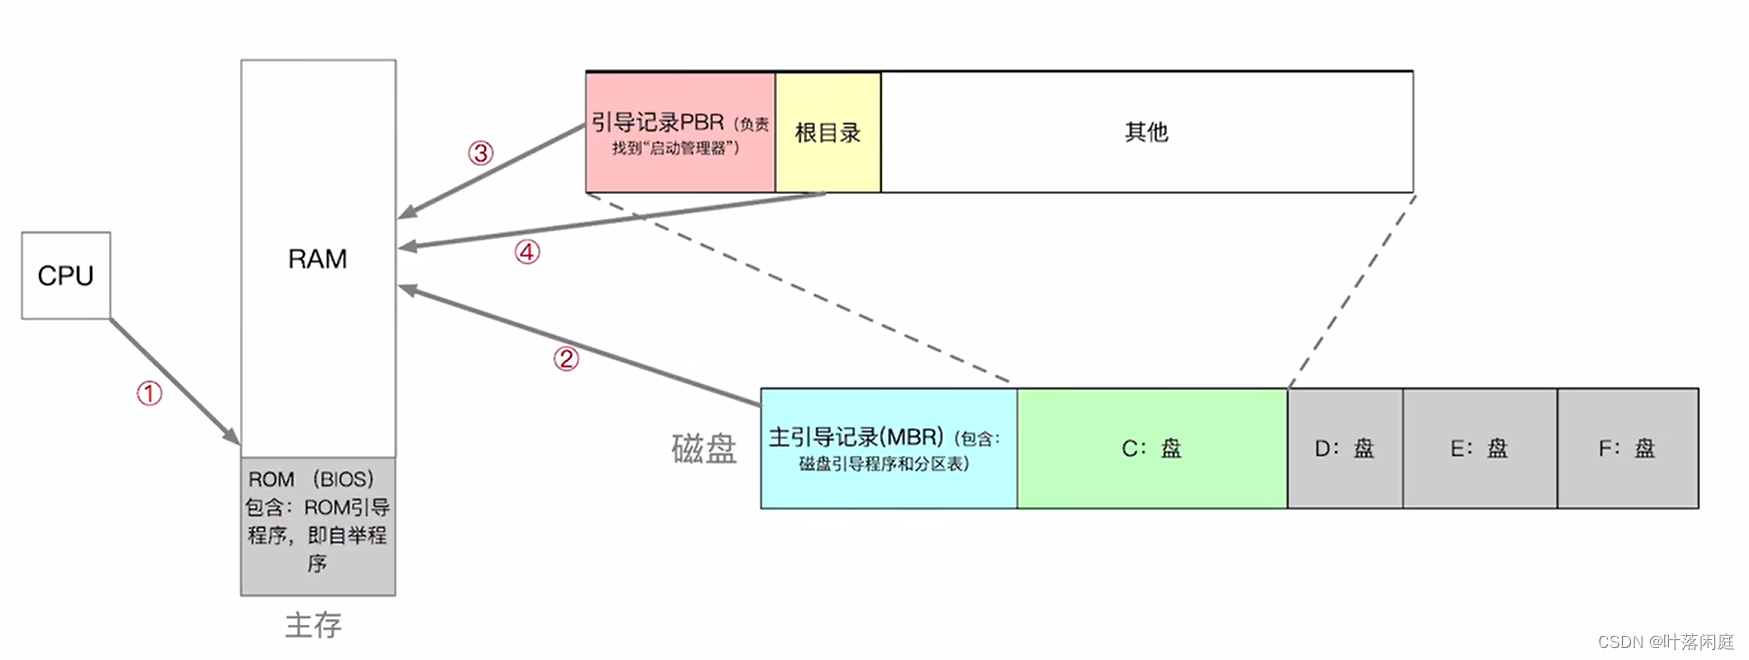
- 1.CPU从一个特定的主存地址开始,取指令,执行ROM中的引导程序(先进行硬件自检,再开机)
- 2.将磁盘的第一块 – – 主引导记录读入内存,执行磁盘引导程序,扫描分区表
- 3.从活动区(又称主分区,即安装了操作系统的分区)读入分区引导记录,执行其中的程序
- 4.从根目录下找到完整的操作系统初始化程序(启动管理器)并执行,完成“开机”的一系列动作
三、虚拟机
- 虚拟机:使用虚拟化技术,将一台物理机器虚拟化为多台虚拟机器(Virtual Machien ,VM),每个虚拟机器都可以独立运行一个操作系统
- 同义术语:虚拟机管理程序/虚拟机监控程序/Virtual Machien Monitor(VMM)/Hypervisor
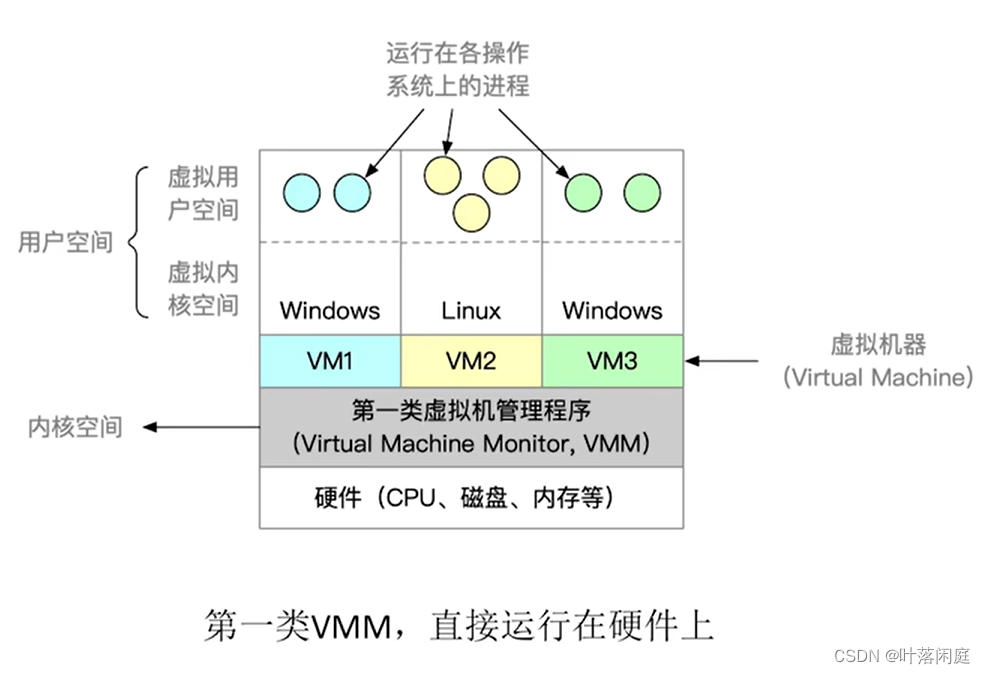
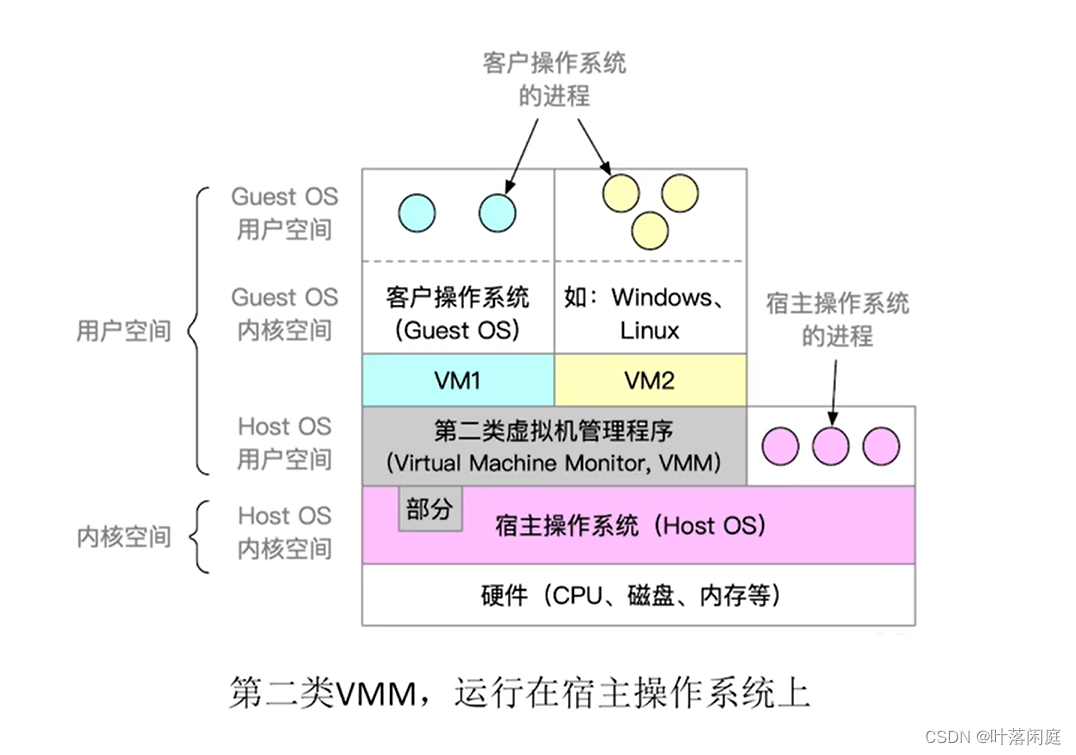
- 两类虚拟机管理程序(VMM)的对比
| 第一类VMM | 第二类VMM | |
|---|---|---|
| 对物理资源的控制权 | 直接运行在硬件之上,能直接控制和分配物理资源 | 运行在Host OS之上,依赖于Host OS为其分配的物理资源 |
| 资源分配方式 | 在安装Guest OS时,VMM要在原本的硬盘上自行分配存储空间,类似于“外核”的分配方式,分配未经抽象的物理硬件 | Guest OS拥有自己的细腻==虚拟硬盘,该硬盘实际上是Guest OS文件系统中的一个大文件,Guest OS分配到的内存是虚拟内存 |
| 性能 | 性能更好 | 性能更差,需要Guest OS作为“中介” |
| 可支持的虚拟机数量 | 更多,不需要和Guest OS竞争资源,相同的硬件资源可以支持更多的虚拟机 | 更少,Guest OS本身需要使用物理资源,Guest OS上运行的其他进程也需要物理资源 |
| 虚拟机的可迁移性 | 更差 | 更好,只需导出虚拟机镜像文件即可迁移到另一台Guest OS上,商业化应用更广泛 |
| 运行模式 | 第一类VMM运行在最高特权级(Ring O),可以执行最该特权的指令 | 第二类VMM部分运行在用户态、部分运行在内核态,Guest OS发出的系统调用会被VMM截获,并转化为VMM对Guest OS的系统调用 |